Kitchen Before and After

Five years in to owning this house, we finally bit the bullet and did a full kitchen renovation. We did it on an extreme budget and even more extreme timeline-- finishing on December 22 with holiday guests arriving the same day. In the end we love it and wouldn't change a thing. All sources below! 

kitchen remodel after

The best part of our existing kitchen was the windows, view, and the natural light. We didn't want to change the layout much, but wanted a light, bright space (I'm an unapologetic white kitchen lover). The color choices were easy. The original oak cabinets were not aging well and used space inefficiently. 

kitchen renovation BEFORE & AFTER.jpg

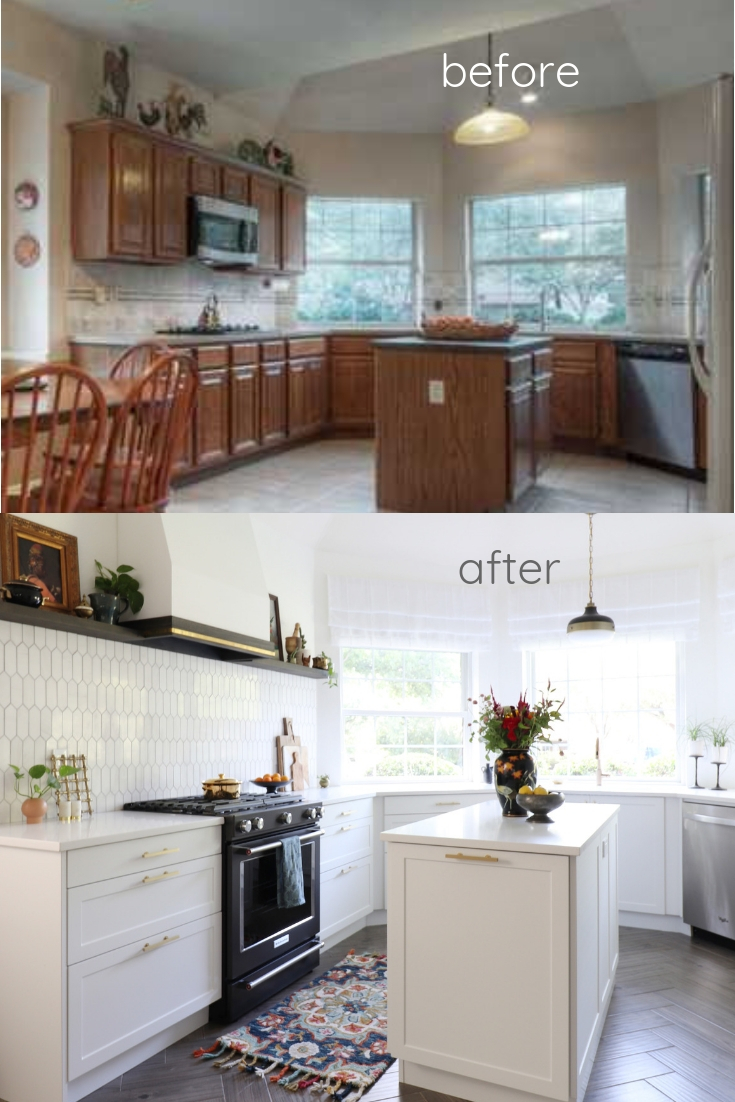
Full disclosure, I'm using the MLS photos from when we bought the house for the before photos. We'd made incremental changes along the way like painting the cabinets, etc. I love looking at the dramatic change from dark to light.

full white kitchen remodel.jpg

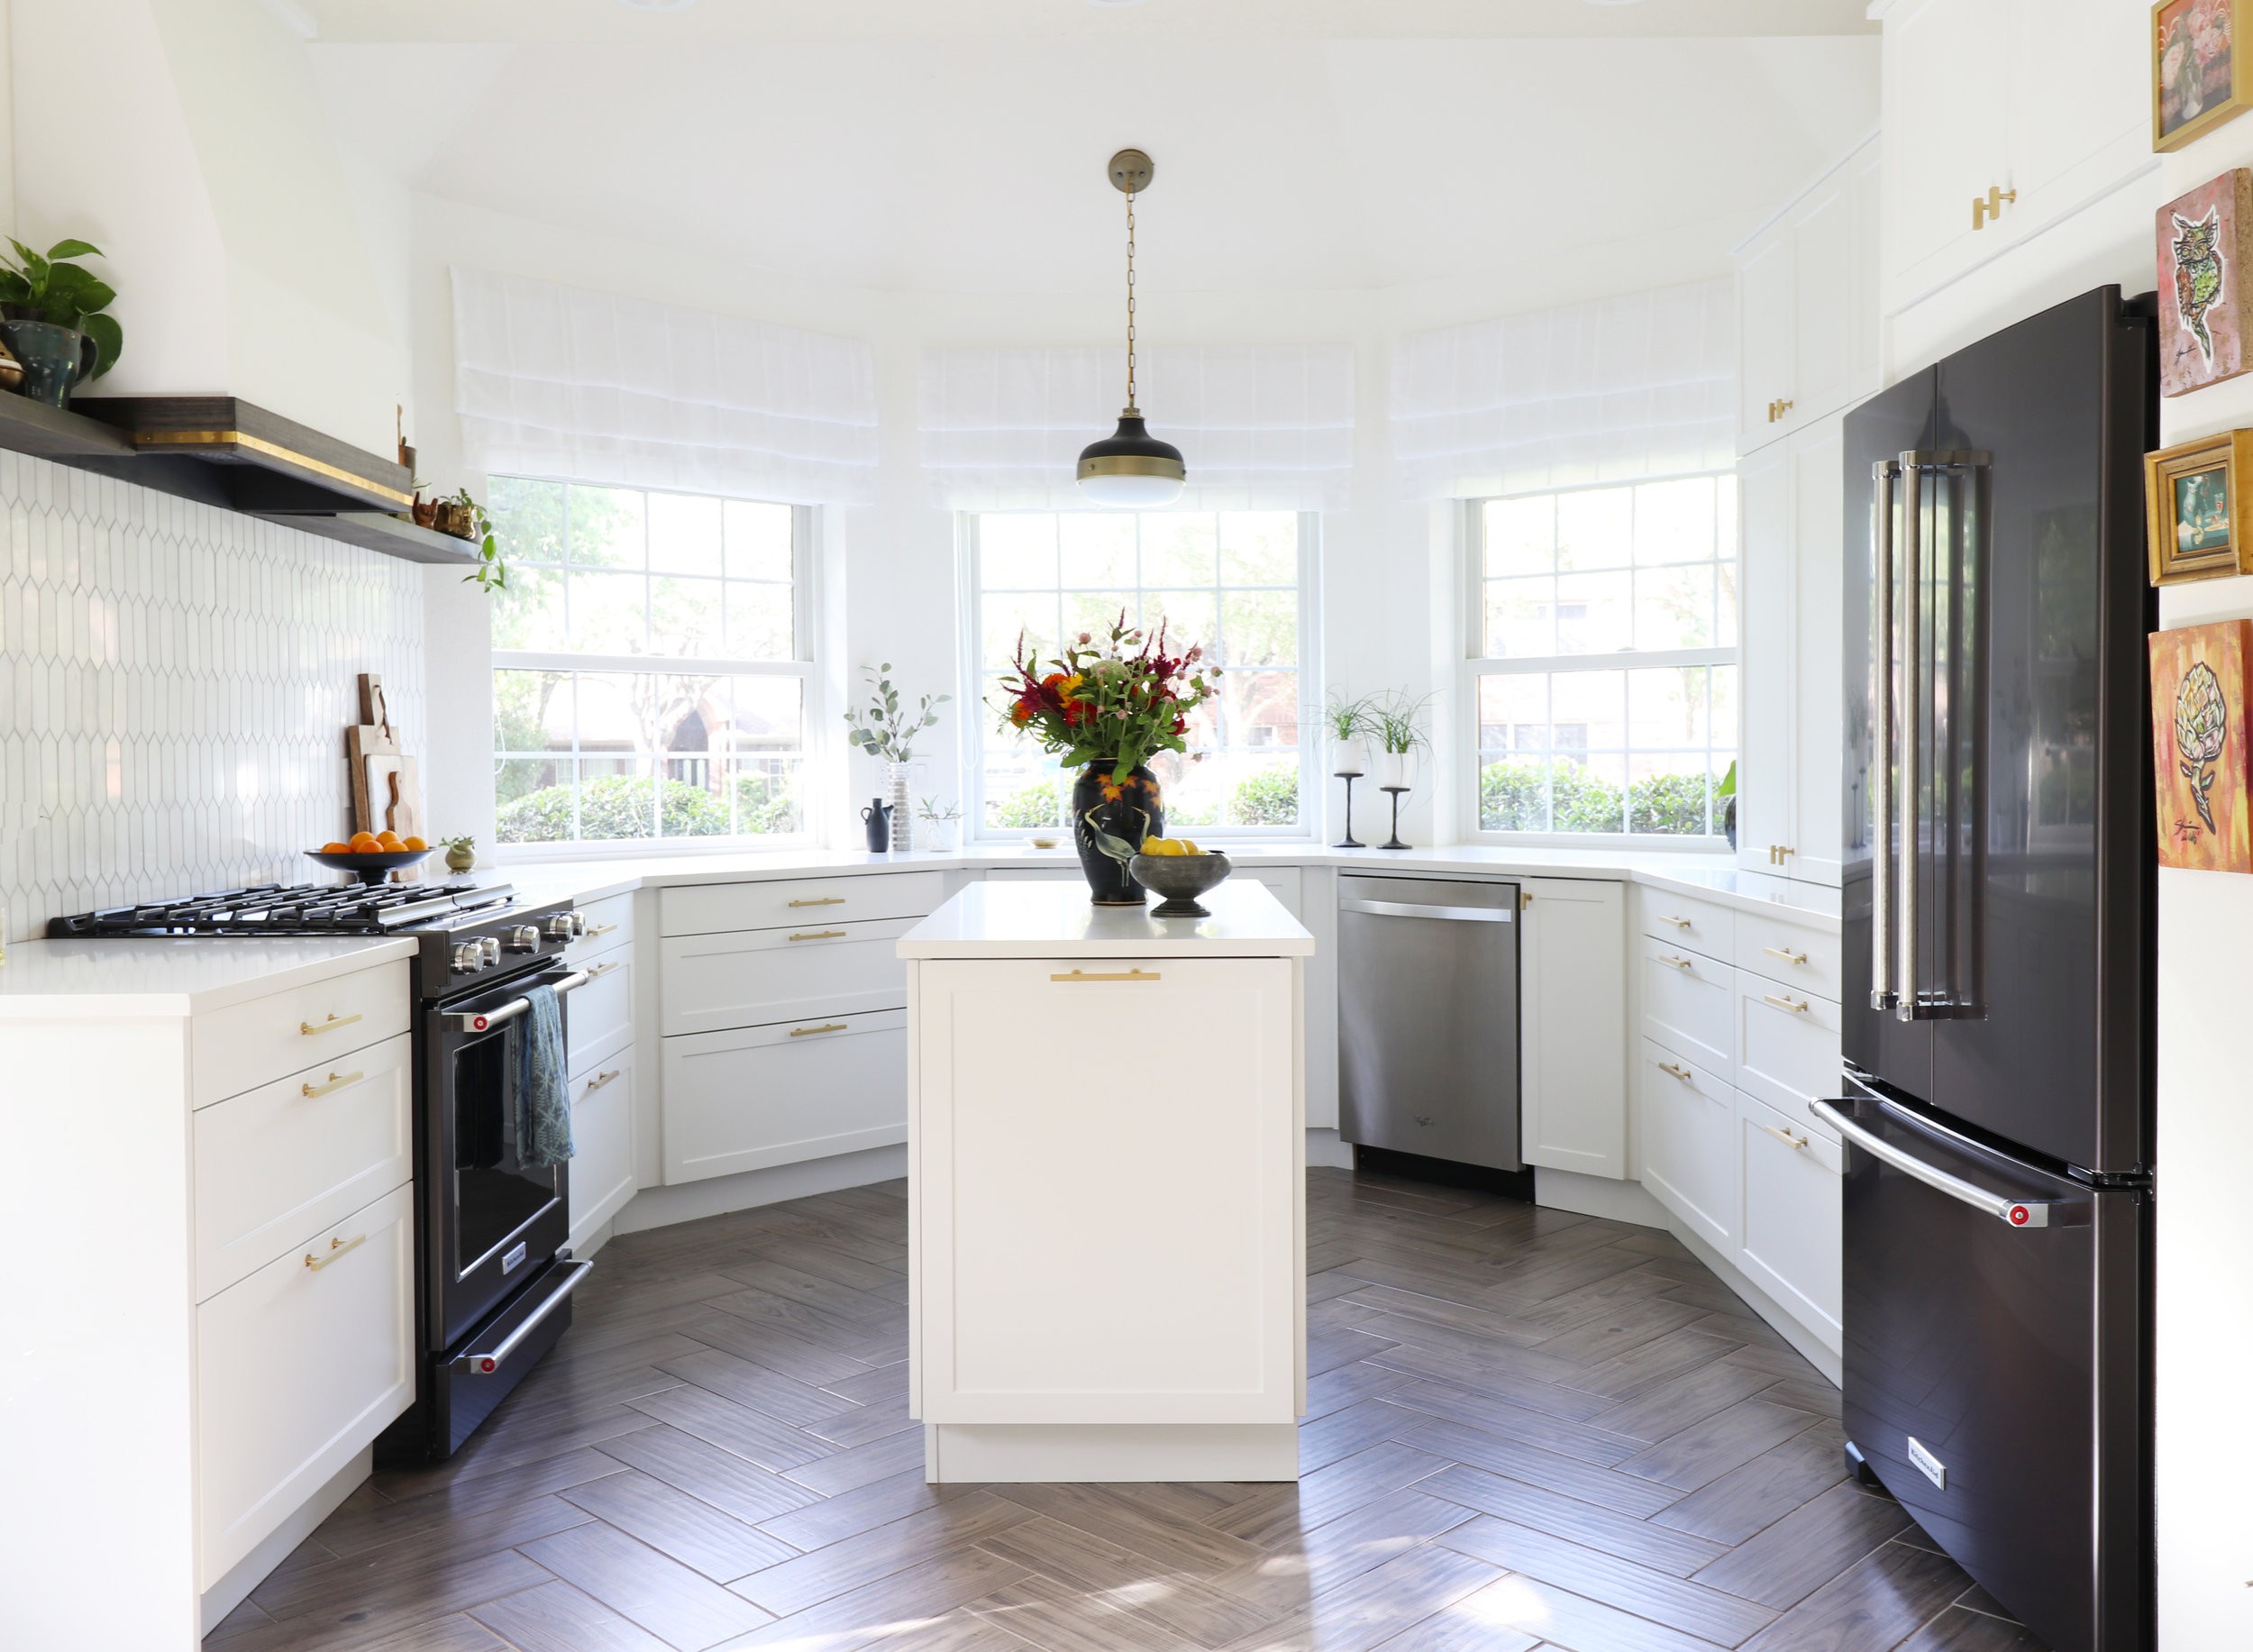
We decided to remove all of the upper cabinets on the left side and install a custom range hood and simple open shelving. On the refrigerator side, we removed the double oven (see before pics below) and installed tall upper cabinets. All of the base cabinets have three drawers. I can't recommend cabinets with drawers over cabinets with shelving more. We now have fewer total cabinets but so much more storage!

kitchen and dining room remodel.jpg
kitchen remodel with custom hood.jpg

The cabinets are IKEA Sektion boxes with Semihandmade Super Matte Shaker doors.

kitchen custom hood with brass detail .jpg
kitchen remodel.jpg

My ultimate favorite improvement to the kitchen is our appliance hotel. It may seem small, but having our microwave, toaster, coffee grinder and coffee maker all behind closed doors is heaven. The upper cabinets sit on top of the counter top, which added time and complication to our installation plan, but being able to just shut the door and never see all that stuff was the best decision.

kitchen before 2.jpg
kitchen remodel after.jpg

The new counter depth refrigerator is a big improvement design-wise but I'm not going to lie, we are still adjusting to having less space (especially freezer space). Overall, it's making us more conscious of what we buy and what we already have so I'm embracing that. I haven't missed the double oven one bit.


SOURCES

Primary Bedroom Makeover

The first time I saw this mural from Rebel Walls, I knew I had to design a room around it. The mural was the big splurge in my budget, and so worth every penny. I love the drama it brings to our primary bedroom.

THE PLAN

master bedroom mood board kristin laing designs.png

I'm still shocked at how closely I followed my own plan, that almost never happens! 

AFTER

master bedroom makeover with wall mural.jpg

The wallpaper went up easily and in less than day. I'm asked for sourcing details all the time, so see the sourcing details below.

kristin laing designs master bedroom makeover.jpg
master bedroom makeover kristin laing blog.jpg
kristin laing master bedroom nightstand detail square.jpg

BEFORE

bedroom makeover before.jpg

And here's a quick look at how the room looked when we bought the house. It was already a beautiful space with great moody lighting. It's so much more cozy, dramatic and personal now. 

SHOP THE ROOM

Sources

mural
chandelier- DIY
paint color- Benjamin Moore Albescent
trim color- Benjamin Moore White Dove
bed 
nightstands
flokati rug
table lamps
velvet duvet and shams
velvet throw pillows
fan pillow


Tween Girl Bedroom Revamp with Rebel Walls

When Rebel Walls contacted me about collaborating on my daughter's bedroom makeover, I jumped at the chance. I used one of their murals in my master bedroom last year and am so very happy with that decision. The mural is printed to fit the wall exactly AND there is no repeat to match up, so no waste. In my experience, it is much easier than hanging normal patterned wallpaper.

Tween bedroom with cloud wall mural.jpg
tween girl bedroom makeover.jpg

What I didn't take into consideration was how hard it would to be to agree on a design for the room! My "client" was a nine year-old girl who has very strong opinions and tastes. We also had to take in to consideration that she has lots of windows and a huge headboard. A feature wall was not going to do the trick, so we had to plan for a mural that would go on all four walls without overwhelming the space. After much discussion, Cuddle Clouds was the mural we decided on. 

girls bedroom redesign with Rebel Walls cuddle clouds mural.jpg
girls bedroom makeover with Rebel Walls cloud wallpaper
cuddle clouds color change.jpg

Before we decided on using wallpaper in this room, we talked about a color scheme. My daughter wanted to paint the walls aqua and use mustard accents. The original Cuddle Clouds design was not exactly the colors we wanted, so luckily Rebel Walls is very open to working with clients to customize their wallpaper. I wanted some of the blue in the paper replaced with greener tones. I send the image shown to the in house designers and and after two revisions, we got the paper just where we wanted it color-wise.

installing wall mural.jpg

I installed the mural myself and yes, it's and undertaking to do four walls of a 12 x 18 foot room. The most challenging part was the four windows and two doorways, I didn't deal with either of those in the master bedroom. I've been asked a number of times if it's realistic to DIY the mural hanging and YES, it is! It can be frustrating at times but it's not hard. You can do this. 

Besides the wall mural, the rest of the room was a real budget makeover. We all know that a girl's taste will change over the next few years, so we didn't invest in any new furniture. We added new bedding, curtains and curtain rods, and some new accent pieces.

Rebel wall cuddle clouds wallpaper in custom colorway.jpg

Overall, we have a super happy girl who loves her new room! Shop the room below.

Tween girls bedroom makeover with cloud wallpaper.jpg

SHOP THE ROOM

Wallpapered Stairway Before and After

I partnered with Poland-based wallpaper company Coloray Decor to do a quick facelift on our stairway. Their peel and stick wallpaper is custom printed to order and shipped for delivery in two days.

Wallpapered stairway before and after.jpg
coloray decor wallpaper.png

I absolutely loved several of their designs, but I could really picture this old world painting on the stairway. The design is called Vase of Flowers.

BEFORE


Starting from the very beginning, this is how it looked when we purchased the house. We've made a few incremental changes including painting the banister and replacing the carpet with solid wood stair treads and risers. Removing the carpet was one of the most satisfying upgrades. I stained the treads with ebony stain and painted the risers white.

wallpapered stairway before.jpg

Never one to leave good enough alone, I wanted to try adding more pattern to the space with temporary wallpaper. I love that it's easily removable in case we decide we're done with it or want to move on to another pattern!

wallpapered stairway DIY.JPG

Coloray printed and cut the paper to may exact specifications. I measure the risers and found that they were all close to the same size, but there were variations. I ordered the paper to fit the largest riser, then trimmed down the pieces that were too large on the smallest risers. Since the wallpaper is basically a big sticker, you just remove the backing a stick it on. The only tools needed were scissors and a utility knife.

wallpapered stairway DIY.jpg

And that's it! It took a several hours to do the entire staircase, mostly because of the trimming. It took a little while for my eye to get used to it but I love the result.

How to Propagate Snake Plant

ow to propagate snake plant.jpg

There is nothing quite so satisfying as getting a brand new plant from a plant you already have. I want to share my recent success with rooting Sansevieria (also known as snake plant) in water, a method that, according to several gardening sites, shouldn't work!

I have an old, neglected snake plant that was starting to look sad and leggy. I cut off six of the longest stalks to try to balance and revitalize the plant. Without overthinking it, I placed the cuttings in water in a glass vase on my desk. It took a few weeks, but roots started to form. I was in no hurry, so I just let them continue to live in water for about six months.

how to propagate snake plant.jpg
how to propagate snake plant detail.jpg

Last week I noticed that all of the cuttings had really strong looking root systems, and one actually was starting to send up a rhizome which is a clump of new leaves.

Today I potted these rooted cuttings and I'm hoping to see them continue to thrive.

how to propagate snake plant styled detail.jpg

Updating an Updated Bathroom

This bathroom was long work in progress to say the least. We bought the house knowing that we'd need to remodel the master bathroom first thing (it was gross!). My husband was in a hurry to get it done, while I was dragging my feet trying to come up with the ideal design. Finally I gave in to starting the project while still not really knowing what I wanted. That's a bit of a problem. Our other problem was budget -- this is a large bathroom, over 130 square feet. That's a lot of materials and it adds up fast.

We went with a classic all white design which made us both happy. At the time (this project started almost two years ago) as much as I wanted brass faucets and fixtures, they were really expensive. So on our first pass, we ended up going with satin nickel everywhere. Over time I realized that the satin nickel was a huge mistake. It all looked fine but it didn't feel like me. In fact, much of what we did with fixtures I ended up hating -- this is why you shouldn't remodel when you aren't ready and don't have the budget to do what you really want! Lesson learned.

So, two years later I took another pass at this bathroom. It really needed to be warmed up and even masculinized a little. To my husband's dismay, I was ready to mix metals by adding warm antique gold tones with new mirrors and sconces.

updated master bathroom by Kristin Laing Designs

We splurged on a new solid brass urchin chandelier that I love every time I walk in. Worth it.

On the bathtub side, I used two West Elm hexagon mirrors to create a version of a full length mirror that brought style and interest to the room. I added life and texture by filling the ledge above the freestanding tub with more plants. And finally, one of my own paintings for color and personality.

Updated master bathroom by Kristin Laing Designs

Yes, it took two years but now this bathroom feels like mine. We'll share more photos later. For now, feast your eyes on the before photo (before photos always need to be bad don't they?).